
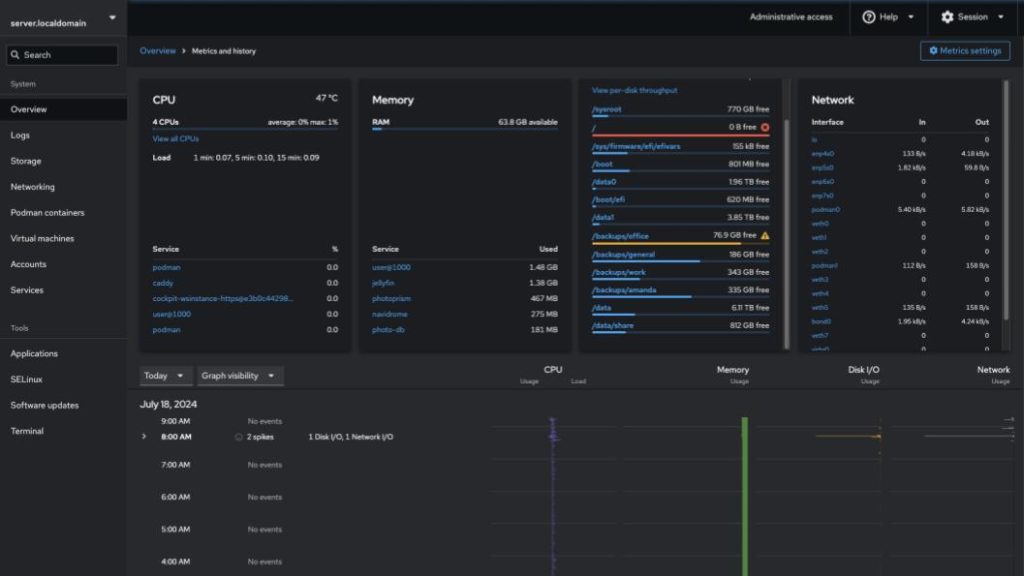
Earlier this year I put together an upgraded home server. In all honesty, I’ve been loving it. Not only has the hardware & disk layout worked really, but deploying all my applications as containers has made everything just work and I haven’t had to put my hands on the system once. Everything is self updating. ….until something inevitably breaks, but I’ll worry about that later. ;)
My goal from the beginning was to deploy this using bootc, but due to some time pressure at work that wasn’t possible. I finally made some time and successfully moved the system over to fedora-bootc, and I’m going to share my experience for others considering doing the same. Keep in mind that I don’t expect details of this post to age very well as the tech is moving pretty fast.
Why use a bootc image for the OS?
For the past decade we’ve been using containers to decouple applications from the OS. It’s an amazing concept that has probably done more to move the industry forward since virtualization or cloud computing. This separation has led to immutable OS’s, often inspired by CoreOS, to facilitate running containers. I’ve been a huge fan of these offerings, but there’s always an amount of customization needed that is challenging. What’s amazing about bootc is we can build, deploy, & manage the OS as if it’s a container. If you’re not familiar with it, a good place to get up to speed is here. Personally, the biggest advantage for my setup is to unify the management of my apps & OS. I’ve long wanted to use git as a means to handle OS updates and rollouts, and bootc is perfect for that.
The OS becomes a simple Containerfile and most configurations are just text files that we’ll copy into the OS. Here’s an illustrative example:
FROM quay.io/fedora/fedora-bootc:40

RUN dnf install -y [system agents] [dependencies] && dnf clean all

COPY [unpackaged application]
COPY [configuration files]
Here’s the approach I used to migrate my system
Step 1: Identify installed rpms
A quick look at the output of rpm -qa | sort | less makes it easy to see what rpms need to be added. You really only need to grab the packages you care about. Don’t worry about low-level ones like the kernel, grub, firmware, systemd, etc. For my setup, this is what my Containerfile looks like:
FROM quay.io/fedora/fedora-bootc:40
COPY etc etc

RUN dnf install -y cockpit cockpit-podman cockpit-storaged cockpit-ws cockpit-pcp cockpit-machines cockpit-selinux bash-completion borgbackup bwm-ng cups cups-browsed ethtool firewalld git lm_sensors nfs-utils nss-mdns pcp pcp-selinux samba sysstat tftp-server tuned wget && dnf clean all

RUN systemctl enable lm_sensors sysstat tuned fstrim.timer caddy-build.timer podman-auto-update.timer cockpit.socket

#these are the various mounts I use
RUN mkdir -p /backups/family /backups/general /backups/office /backups/work /data /data0 /data1 /data/share
See how simple and straightforward that is? All of the workloads get handled in the next section, but for the main operating system this is crazy easy!!
Step 2: Grab files from /etc
Grab everything you want to keep from /etc and we’ll copy it into the container via the COPY etc etc line. For my setup the biggest things were quadlets in /etc/containers/systemd, network keyfiles in /etc/NetworkManager/system-connections/ and custom unit files under /etc/systemd/system. I also had a handful of other config files that were easy to grab. I’ll note that for most environments & use cases networking configs should be handled via kagrs, kickstart, or cloud-init or ignition. Keep that in mind if you’re using one image for multiple systems which is the most common scenario. For this specific system, I have a ALB bond w/ a static IP and since it will only live on this one system, it’s actually really nice to have the configs inside the image.
Step 3: Create a Kickstart
If you’re wondering, “how does booting a container work!?”, this is where it will all start to make sense. Even though we have the full OS packaged inside the container image, there’s no concept of partitioning or disk layout. Since I’m targeting a bare metal box here, anaconda/kickstart will handle the disk partitioning, pull the container image, write it to disk, and finally setup our users. It’s definitely possible to completely configure the OS inside of the container image, but unless it’s an embedded-style use case, I typically prefer injecting users, keys, etc via cloud-init for VM/cloud instances or kickstart for bare metal. In my case, it was paramount to not loose any data. This is where ignoredisk --only-use=nvme0n1 is a life saver. I always have some typos w/ kickstart (well, anything computer related) and this option helped me iterate w/o fear!
text
network --bootproto=dhcp --device=link --activate --hostname=[hostname]

keyboard --vckeymap=us --xlayouts='us'
lang en_US.UTF-8

ignoredisk --only-use=nvme0n1
bootloader --append="i915.enable_guc=2"
part /boot/efi --fstype="efi" --onpart=nvme0n1p1
part /boot --fstype="xfs" --recommended --onpart=nvme0n1p2
part pv.01 --onpart=nvme0n1p3
volgroup fedora pv.01
logvol / --fstype="xfs" --name="root" --vgname="fedora" --size=800000
reboot

ostreecontainer --url [registry]/[account]/[image]:[tag]
user --name=[user] --groups=wheel --iscrypted --password= [hash]
sshkey --username mrguitar "ssh-rsa AAAAB3NzaC1yc2EA...

rootpw --iscrypted [hash]
sshkey --username root "ssh-rsa AAAAB3NzaC1yc2EA...
Step 4: fstab or mounts?
My original system had all the mounts defined in /etc/fstab, as one would expect. I originally thought I would grab generated mount units under: /run/systemd/generator/*.mount and include additional mounts in container image. I think this would work really well, but I ended up copying my original fstab into my image as old_fstab and just manually moved the relevant parts over. I’m not saying this is the best option, but it was effective here, and you only have to touch it once.
Step 5: Back up Podman Volumes
I had a handful of podman volumes that I didn’t want to lose data. Fortunately these are crazy easy to backup via podman volume export. I found a script that will cycle through and backup the volumes in one shot. The script is simple, but effective! podman-volume-backup.sh
What went well?
Ultimately, I was really happy with everything. The whole process was easier than I was expecting. I had no data loss and all of my containerized apps came back on-line w/ zero intervention. The combination of using quadlet & volumes made it soooooo easy!
What could have used improvement?
I originally planned to deploy the container image w/o using kickstart, and instead use bootc-install (covering this is out of scope for this post but it’s awesome for different reasons). There are limitations using bootc-install on an LVM system. Had I picked kickstart from the beginning this whole process would have taken less time. I did kick the system 8 times. Now most of these, maybe 5 were due to dumb typos, the rest were over partitioning anomalies. I was pretty frustrated that there wasn’t an interactive installer option. Since this is a one-off install there’s not a whole lot of value in having it defined in kickstart. I later learned that if a kickstart file only contains the ostreecontainer command, that anaconda will provide the exact interactive experience I was wanting. This is a great tip for others! I also forgot to backup my firewall rules. These weren’t too bad to add in after the fact, but it would have been ideal to not have to recreate these as I do have a couple complex rules. Finally I forgot some packages like vim & git. Those were super easy to add to my containerfile and add during the next update.
Speaking of updates, how does that work?
It’s crazy easy to create updates. First, create the updated image as you would build any other container: podman build -f [containerfile] -t [image:tag] Second, make the image available on a registry: podman push [image:tag] Finally, bootc-fetch-apply-updates.timer will take care of the rest! I do recommend adding a systemd drop-in to adjust the timer to run when it’s appropriate for your environment. Some will inevitably disable the timer and be better served applying updates manually.
Your turn!
Anyway, the results are amazing. Updates are flawless, I have perfect OS & app isolation, and the whole setup is crazy easy to automate. I’ll write another post soon with my Gitea setup showing how container rebuilds are done. In the meantime here are some helpful links to help you get started:
Get involved:
Forum https://discussion.fedoraproject.org/tag/bootc-initiative
Matrix https://matrix.to/#/#bootc:fedoraproject.org
Bootc Images:
quay.io/fedora/fedora-bootc:40
quay.io/centos-bootc/centos-bootc:stream9
Awesome Projects:
https://podman-desktop.io – check out the bootc extension (included with the red hat extension pack)
projectbluefin.io – what I’m running on my daily driver laptop. I highly recommend Bluefin!
Docs:
Hey had time to watch this talk today, when in London and before flying home to Sweden
Awesome! One day I would love to visit Sweden – that’s a bucket list thing for me. I’m actually putting together a new desktop and will be doing the same w/ a bootc image there as well. Hopefully I’ll have another blog on that in a couple weeks. Cheers