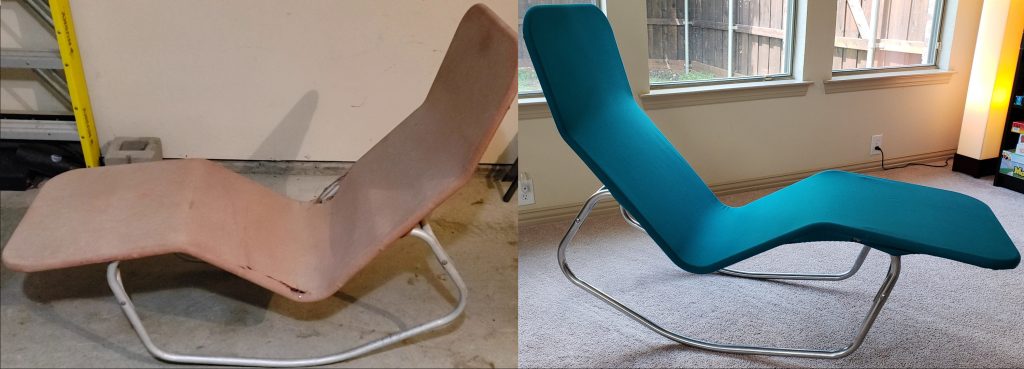
Barwa chairs are amazing. It’s a mid-century modern chair that features two sitting positions; both are incredibly relaxing and comfortable IMO. The design is incredibly smart yet simple and elegant in the execution. The chair pictured here belonged to my father’s family and is approximately 70 years old. In April of 2021, Amanda and I restored it and documented a fair amount of the work here on youtube. Covers are incredibly difficult to come by, but the good news is you can make your own! Start by watching the videos and I’ll detail as much of the process as possible here. Also, please leave comments with your tips, suggestions, etc. I’ll keep this page updated based on feedback, and hope that it becomes a valuable resource to help others maintain these wonderful chairs.
Update 7-5-2021 – Due to the response we’ve had from this post, Amanda and I are going to make a small run of covers for anyone who’s interested. This will probably take us a month or two to complete as we want to source a fabric that’s closer to the original. I’ve also been unable to find decent replacement springs and am looking into getting them custom made. Finally we’re acquiring a couple more Barwas so we’ll have extra frames to fit the covers to and ensure they’re done right before shipping. We’re looking forward to this and will continue updating this post so anyone can still make their own. If you’re interested please leave a comment below or send an email to barwachair@gmail.com. Thanks!
Update 7-20-2021 – We have a website now! …granted there’s not much to see at the moment, but the content will improve as we get further along and have our suppliers and materials sorted out. https://barwachair.com is where we’ll be in the future. I’ve slightly adapted this blog post to fit on the new site as well as a new one for How to Polish a Barwa Frame. If anyone else wants to get on the waiting list for covers and/or springs, please reach out to us here. -Ben
The Materials
While researching this chair, I found this article by Marisa Bartolucci, the daughter of one of the designers of the Barwa. I reached out and she was kind enough to respond regarding the type of fabric used on the cover. In summary, she says her father wasn’t a purist about the chair and recommends to “go with whatever pleases you and works technically.”
The Fabric
We chose a water resistant, indoor/outdoor upholstery canvas we found at Joann’s. This fabric works really well, although it’s softer and has more give than the original cover. This has pros and cons, but ultimately is a great option. You will need at least 2.5 yards of fabric, but we went with 3 yards just to be safe. (please comment below if you find more good fabric options and we’ll add them)

Grommets
The cover requires a total of 18 grommets. We found that 3/8″ ones here work really well and include the tools needed to crimp them with a hammer.
Springs
There are a total of 12 extension springs. The originals are 1/2″ thick, core wire measures 1/16″, and I believe they’re made of stainless steel. They were made with a slight extended hook that’s difficult to match from “off-the-shelf” springs. I’ve contacted ten or more vendors asking for replacements and I’m unable to find a decent alternative.


Sash Chain
The original chain is 166.5″ in length with a 1″ S Hook (clamped), which gives a 53.3 inch circumference. Once sewn into the cover the chain should be snug when fitting over the frame. Be as precise as you can on the length.


I checked with several vendors and this looks like a good replacement that’s weighted at 150lbs. The links are slightly longer than the original, but I don’t believe it’s long enough to cause an issue. (unverified)
S-Hook – I haven’t found a good source for this yet, but I suspect they’re readily available at hardware stores. I would very much appreciate a link if someone can verify a good fit.
Washers
Qty 2 1/2″ washers (outer diameter of 1.375″). These are available at any hardware store and can likely be sourced locally for less money than online.
The pattern

The pattern is too large to print on a standard printer, so we’ve provided the dimensions for you to recreate it. We used packing paper for ours, but feel free to use whatever is handy. We traced our original cover and added a 1/2″ for a seam allowance. We recommend finishing the edge of your cover as many fabrics can fray and this is a simple step to prevent that.
Putting it Together
First, steam and iron the fabric to smooth it and preshrink it. Then fold and pin the initial 1/2″ hem and sew it all the way around (stitchline 1/4″ from finished edge). Next, fold and iron the 1 1/2″ seam allowance, then sandwich the chain in the folded over seam allowance and pin in place. The diameter of the chain will be smaller than the cover and this will help the cover begin to take it’s proper shape (see this part of the video for details). Make sure the corners bunch the fabric (tack/pin down about 3 folds on each corner) before sewing; since the chain is smaller, smooth out a section at a time while sewing.
Test Fitting
Before adding the grommets, install the cover on the frame. It should be tight, but not impossible to pull over all the edges. We found it easiest to place the head and foot over the frame first, then pull the sides down and wrap the corner at the seat of the chair last. Once the cover is exactly where you want it, mark the grommet locations. We intentionally left these off of the provided pattern as we think it works better marking them after fitting the cover.


Once all the Grommets are installed, add the springs and smooth out the fabric if needed. That’s all there is to it and time to relax in your like-new Barwa! If you found this post helpful or lacking please let us know so we can improve it for others.


Leave a Reply